Listings Widget

Published by Matthew Talamini in on Tuesday, January 29th, 2019

Welcome to the NowRenting Help Center

What can we help you with today?

    > Listings Widget

Listings Widget

The listings widget allows you to display your Listings on your own website. Navigate to Settings > Public Website > Widgets.

NowRenting: Listings Widget

Clicking the theme and palette preferences link will take you to the Colors & Content tab, where you can choose between four professionally-designed themes and six palettes. As well as determining the style of your public site, these settings also control the style of the Listings shown by the widget.

Click the See a preview link to open a new browser tab that shows the listings widget as it will appear on your site. The widget allows visitors to sort by location or price, and to use NowRenting’s powerful filtering tool to find just what they’re looking for. Each Listing also has a Schedule a Showing link, which lets a visitor request a showing appointment.

Installation

To install the listings widget, all you have to do is copy the code into your site’s HTML. Each hosting service or web platform will have their own way of facilitating this. If you’re not sure what to do, talk to your webmaster.

Schedule Showings by Phone

Published by Matthew Talamini in on Tuesday, January 29th, 2019

Welcome to the NowRenting Help Center

What can we help you with today?

    > Schedule Showings by Phone

Schedule Showings by Phone

If you have the schedule showings setting enabled, NowRenting allows Leads to schedule a showing by phone, through an interactive voice response system. Also useful as an accessibility feature, Leads can interact with this system by voice or telephone touchpad.

To configure your message settings, go to Settings > Message Settings. This menu allows you to manage your NowRenting contact information. Under the Phone calls & voicemail heading, you can choose to send your NowRenting number’s voice calls to a different phone number, that you specify (such as your office or personal phone) or to use NowRenting’s IVR system to handle those calls.

NowRenting: Message Settings

Click the Manage call flow link to set an initial greeting, as well as to specify a voicemail greeting for users who choose not to schedule a showing.

NowRenting: Call Flow

Scheduling a Showing by Phone

Users interacting with the voice showing scheduling system will be able to navigate a series of menus:

  1. Main Menu: The caller can choose to schedule a showing for a particular listing or leave a voicemail.
  2. Listing Street Number: If the caller wants to schedule a showing, they’ll be asked for the street number of the listing.
  3. Listing Zip Code: If you have multiple Listings with the same street number, they’ll be asked for the zip code of the listing.
  4. Listing Address: The system will say the address of the listing. If showings are enabled for the listing, they’ll be asked whether they want to schedule a showing. If the listing is wait listed, they’ll be asked if they’d like to join the wait list.
  5. Showing Date: If you have specified availability, the system will offer those dates to the caller first. They will also be able to pick a date for the showing appointment.
  6. Showing Time: The caller will be able to specify a time for the showing appointment.
  7. Confirmation: The system will say the address, date and time of the showing appointment, and ask for confirmation.
  8. Contact Information: The system will ask for an email address or phone number where the caller can be reached. Future communication through NowRenting will be sent there, including confirmation requests, appointment reminders and feedback requests.

Export Showings Calendar

Published by Matthew Talamini in on Tuesday, January 29th, 2019

Welcome to the NowRenting Help Center

What can we help you with today?

    > Export Showings Calendar

Export Showings Calendar

NowRenting provides an up-to-date iCal feed of your showings. To turn this on and access it, first navigate to Settings > Showings, then click the calendar icon in the upper right.

NowRenting: Export Showings -- Navigate

The enable / disable button allows you to turn your showings calendar feed on and off. To access the URL for your feed, first click the Enable button to turn it on.

NowRenting: Export Showings -- Enable

The Showings Feed: Click to Copy URL link represents a web address where other calendar applications can go to access your showings calendar. Clicking the link will copy the address to your clipboard. From there, you can paste it into the settings menu of any application that’s able to subscribe to iCal feeds.

NowRenting: Export Showings -- Copy Link

A few of the most popular calendar applications, with links to external help articles, are listed below:

Google Calendar

You can add your NowRenting showings to a Google calendar by going to Add Calendar > From URL and pasting in the link provided by NowRenting’s Export Showings window. For more information, or instructions for other platforms, see Google’s help article on this function here. (Adding a NowRenting showings feed works the same way as adding someone else’s Google calendar. Look under the Add using a link heading.)

Outlook

Instructions for subscribing to calendars in Outlook.com can be found here. Follow the instructions for subscribing to a calendar, rather than importing.

iOS Calendar

Instructions for subscribing to calendars on a Mac can be found here. The link you copied from NowRenting’s Export Showings window is what this article calls “the calendar’s web address” in step 2.

Showings Availability

Published by Matthew Talamini in on Friday, January 18th, 2019

Welcome to the NowRenting Help Center

What can we help you with today?

    > Showings Availability

Showings Availability

Default Availability Settings

Setting your availability makes it easier for Leads to schedule a showing. When they request a showing, the times you’ve specified will be displayed as available. Also, you have the option to set up automatic approval, so that you’ll no longer need to explicitly accept a showing appointment made during an available time slot.

To change your default showings availability settings, first click the main settings dropdown in the upper right, then select Showings.

NowRenting: Navigate to Showings Settings

The central view of the Showings page is a calendar that displays scheduled showings for all your Leads and Listings. To access the availability menu, click the clock icon in the upper right.

NowRenting: Showings Availability Window

  • Day Of Week, From & To: Use these fields to specify a day of the week and a range of time within that day.
  • Repeats weekly: If you want the same time period to be available each week, check this box.
  • Approval: Choosing Set Appointments will automatically accept requests for appointments within this time block. Take Requests requires that you manually approve appointments as usual.
  • Max. Showings: Specify the maximum number of showings to accept during this time period.
  • Make sure to click Save to preserve any changes to an entry.

NowRenting: Add a Showings Availability Entry

Individual Listing Showings Availability

The same settings are available for individual Listings. Just navigate to the Listing’s details page and click the Showings pill, then the clock icon in the upper right.

Any availability entries specified for individual Listings override the default showings availability settings.

New Features and Performance Upgrades

Released on January 11th, 2019

It’s been a busy week for the NowRenting development team! The beginning of 2019 has brought new users, new opportunities for growth and even some exciting new challenges. In addition to upgrading NowRenting’s performance, we’ve added a number of new features to make your office run more efficiently.

Compact View of the Listings Dashboard

NowRenting Listings Compact View

The new Compact View of the Listings dashboard is for when you need to get things done quickly. It allows you to select multiple listings at once and then syndicate, unsyndicate or delete all of them. The smaller size of each Listing allows you to see more on your screen, and the powerful filtering features are still available.

To access the compact view, click the Switch to compact view link on the right of the Listings dashboard. The same link will allow you to switch back to the default expanded view.

Hide Address Checkbox

NowRenting Hide Address Checkbox

Sometimes you may want to advertise a listing on NowRenting’s broad array of syndication partner sites without publicly revealing the exact address. To enable this, we’ve added a Hide address checkbox to the screens where you add or edit a Listing. When the box is checked, you

Performance Improvements & Bug Fixes

Every software tool will have to make adjustments and upgrades as it grows—and NowRenting is no exception. Our development team worked hard this week to keep NowRenting functioning at a high level of performance. Although many of these upgrades aren’t directly apparent to users, rest assured that you’ll feel their impact in shortened loading times, increased system stability and reduced error messages.

Other New Features
Other feature improvements this week include:

  • Filtering on the Leads dashboard now includes Received Date as an option.
  • The Listing import feature now supports importing listings from your AppFolio listing directory.
  • Exported payments in the Quickbooks Sync dashboard can now be marked as Needs Attention.

Streamline Tenant Management Today with NowRenting

Simplify tenant management with our cloud-based software.

No Hassle · No Obligation · No Surprises

New Features and Performance Upgrades

Released on January 11th, 2019

It’s been a busy week for the NowRenting development team! The beginning of 2019 has brought new users, new opportunities for growth and even some exciting new challenges. In addition to upgrading NowRenting’s performance, we’ve added a number of new features to make your office run more efficiently.

Compact View of the Listings Dashboard

NowRenting Listings Compact View

The new Compact View of the Listings dashboard is for when you need to get things done quickly. It allows you to select multiple listings at once and then syndicate, unsyndicate or delete all of them. The smaller size of each Listing allows you to see more on your screen, and the powerful filtering features are still available.

To access the compact view, click the Switch to compact view link on the right of the Listings dashboard. The same link will allow you to switch back to the default expanded view.

Hide Address Checkbox

NowRenting Hide Address Checkbox

Sometimes you may want to advertise a listing on NowRenting’s broad array of syndication partner sites without publicly revealing the exact address. To enable this, we’ve added a Hide address checkbox to the screens where you add or edit a Listing. When the box is checked, you

Performance Improvements & Bug Fixes

Every software tool will have to make adjustments and upgrades as it grows—and NowRenting is no exception. Our development team worked hard this week to keep NowRenting functioning at a high level of performance. Although many of these upgrades aren’t directly apparent to users, rest assured that you’ll feel their impact in shortened loading times, increased system stability and reduced error messages.

Other New Features
Other feature improvements this week include:

  • Filtering on the Leads dashboard now includes Received Date as an option.
  • The Listing import feature now supports importing listings from your AppFolio listing directory.
  • Exported payments in the Quickbooks Sync dashboard can now be marked as Needs Attention.

What Millennials Look for in Rental Properties

Published by Guest Contributor in on Monday, January 7th, 2019

Welcome to the NowRenting Help Center

What can we help you with today?

    > What Millennials Look for in Rental Properties

What Millennials Look for in Rental Properties

With more than 80 million members in the United States, the millennial generation is easily one of the largest portions of the rental market. And according to some studies, many millennials plan to continue renting late into life.

The rental market can be competitive for both tenants and landlords. But the good news is that millennials tend to look for just a few key things in a potential rental. Check out this list of necessities to help make your property more desirable.

Location

As the old saying goes, the top 3 most important factors that attract potential tenants and buyers
are:

  • Location
  • Location
  • Location

For many millennials, the allure of nearby bars, restaurants, shopping, and other entertainment options can be worth a higher cost. This is the result of the increasing popularity of the desire to sacrifice in order to increase overall quality of life.

Of course, as a generation that prides itself on loving the environment, proximity to parks, trails, and other public open spaces are another drawing factor for millennials. Living in an area lush with greenery or natural habitat can coax even the most adamant city dwellers to their pioneer roots.

Commute

As wages remain stagnant and living costs continue to skyrocket, many millennials look for ways to save on their living costs. This could means a heavier focus on lowering commuting costs.

Similar to their desire for a more cultural location, many tenants look for rental properties close to public transportation. They may also look for properties close to major business centers to cut back on commuting by car.

Amenities

Another key factor that millennials search for in a rental property are included amenities. In an age of convenience, little perks can be a make-or-break for those choosing between two seemingly identical properties.

Some of the top amenities tenants look for in rental properties include:

  • Free Wifi
  • On-site or in-unit laundry
  • Security
  • Access to compost and recycling
  • Covered parking for large cars
  • Storage unit

Millennials like things to be easy and streamlined. The more landlords can include in rental properties, the more likely tenants will find the property appealing.

Pets Allowed

It’s nearly impossible to find affordable, pet-friendly rental units in large cities. Nearly 73% of all millennials own a pet and struggle to find housing. And with an increasing attitude of “I work hard so my pet can have a better life,” more and more millennials are forced to buy homes to accommodate pets.

For tenants interested in capturing this portion of the rental market, consider setting up a half-refundable pet deposit for families with furry members. Also consider allowing a wider array of pet types – many rental properties do not allow certain animal breeds, such as terriers and chows, which forces pet owner to find much more expensive home options.

If you are looking to fill your rental property, be sure to check out NowRenting. This rental management software takes the pain out of finding, screening, signing, and managing tenants with a streamlined, affordable process. Sign up for a 7-day trial today.

Major New Features for Property Managers

Released on December 21st, 2018

This week we’ve got a big upgrade for property managers! NowRenting has already helped you keep track of rent and payments coming in from your tenants. Now it’s possible to keep track of your outgoing expenses, too! The new Properties feature gives an overview of the finances of a property, while the Expenses Sync feature lets you quickly and easily import expense information from your bank into NowRenting.

Properties

NowRenting -- Properties Chart

In NowRenting’s system, a Property represents a single real estate property. Properties are useful in two ways:

  • A Property can be associated with multiple Leases, and incorporates the rent and payment information from those Leases.
  • A Property can have expenses associated with it, which are shown balanced against earnings.

Read more about how to create and manage Properties here.

Expenses Sync

NowRenting -- Sync Expenses -- Choose Lease or Property

NowRenting uses Plaid, a leading financial data connectivity technology, to enable you to sync expense data from your bank account with your Properties. Similar to the QuickBooks Sync feature, this feature makes it easy to manage which expenses go with which Leases, and to see how they all stack up. Read more about connecting to Plaid here, and about syncing your expenses here.

There’s no need for the state of your property’s finances to be hidden in a bank statement! Let NowRenting keep track of it for you with just a few clicks.

Streamline Tenant Management Today with NowRenting

Simplify tenant management with our cloud-based software.

No Hassle · No Obligation · No Surprises

Major New Features for Property Managers

Released on December 21st, 2018

This week we’ve got a big upgrade for property managers! NowRenting has already helped you keep track of rent and payments coming in from your tenants. Now it’s possible to keep track of your outgoing expenses, too! The new Properties feature gives an overview of the finances of a property, while the Expenses Sync feature lets you quickly and easily import expense information from your bank into NowRenting.

Properties

NowRenting -- Properties Chart

In NowRenting’s system, a Property represents a single real estate property. Properties are useful in two ways:

  • A Property can be associated with multiple Leases, and incorporates the rent and payment information from those Leases.
  • A Property can have expenses associated with it, which are shown balanced against earnings.

Read more about how to create and manage Properties here.

Expenses Sync

NowRenting -- Sync Expenses -- Choose Lease or Property

NowRenting uses Plaid, a leading financial data connectivity technology, to enable you to sync expense data from your bank account with your Properties. Similar to the QuickBooks Sync feature, this feature makes it easy to manage which expenses go with which Leases, and to see how they all stack up. Read more about connecting to Plaid here, and about syncing your expenses here.

There’s no need for the state of your property’s finances to be hidden in a bank statement! Let NowRenting keep track of it for you with just a few clicks.

Import Listings

Published by Matthew Talamini in on Thursday, December 20th, 2018

Welcome to the NowRenting Help Center

What can we help you with today?

    > Import Listings

Import Listings

NowRenting allows you to import Listings from other online real estate tools.

Currently supported formats include:

Navigate to the Listings dashboard using the link in the top navigation bar, then click the Import listings… link.

NowRenting -- Import Listings -- Navigate

  • Enter the URL provided by the other tool into the Feed URL text field. (If you’re using AppFolio, enter the URL of your listings directory, like: https://your-company-name.appfolio.com/listings/.)
  • While the Enable Importing checkbox is turned on, NowRenting will periodically check the feed and import any new or updated listings.
  • Click the Import Now link to trigger a one-time check for new or updated listings.
  • If you select the Automatically syndicate imported listings option, NowRenting will attempt to syndicate imported listings automatically. (Note: This option will override the syndication status of listings already imported. So if you’ve stopped syndication for a listing, you should remove it from your feed as well, if this option is checked.)
  • If you select the I’ll manage syndication manually option, then imported listings will be unlisted by default.
  • If you select the My listings are already being syndicated elsewhere option, NowRenting will not syndicate Listings from your feed. NowRenting will show those Listings as listed at first, and then unlisted when they are no longer in the feed. (However, these Listings will be syndicated to Facebook when they first come in.)

NowRenting: Import Listings Window

Changes you make to a listing in NowRenting will not be overwritten by the Import Listings feature, with one exception: If the listing is changed in the feed, NowRenting will update itself with those changes.

Export Leads

Published by Matthew Talamini in on Thursday, December 20th, 2018

Welcome to the NowRenting Help Center

What can we help you with today?

    > Export Leads

Export Leads

NowRenting uses the industry-standard Real Estate Lead Metadata format to export Leads for use in other tools.

Navigate to the Leads dashboard by clicking the Leads link in the top navigation bar, then click the Export leads… link.

NowRenting -- Export Leads -- Link

Enter the email address provided by the other tool you want to export your Leads to. New text input fields will appear to accommodate as many email addresses as you need. Click the checkbox if you want to send all of your current leads to the addresses immediately. Then click Done.

NowRenting -- Export Leads -- Window

The Show replies in NowRenting checkbox controls whether NowRenting will continue to manage communication with the exported leads or not.

  • If you leave the box checked, the leads will be exported with a special email address that will route future communication through NowRenting. When NowRenting receives an email at that address, it will pass it on to the lead and show it in the Messages dashboard.
  • If you uncheck the box, the exported lead data will include the actual email address of the lead. NowRenting may not be able to keep track of future communication with this lead.

Every time you get a new Lead, NowRenting will send an email to the addresses specified. These emails are formatted to be read by people as well as online real estate tools.

NowRenting -- Export Leads -- Email

The code of the email will contain special tags designed to be read by online real estate software.

NowRenting -- Export Leads -- Meta Tags

Follow Up Boss

Follow Up Boss assigns each user a unique email address. (Agents can find this under Admin > API > Lead Email Address.) This is the address you should enter into NowRenting’s Export Leads window.

For more details, see the Follow Up Boss documentation here.

Sync Expenses

Published by Matthew Talamini in on Wednesday, December 19th, 2018

Welcome to the NowRenting Help Center

What can we help you with today?

    > Sync Expenses

Sync Expenses

Before you can sync your expenses to NowRenting, you’ll need to connect to your bank account via Plaid, and create a new Property. Read about connecting to Plaid here and about creating a Property here.

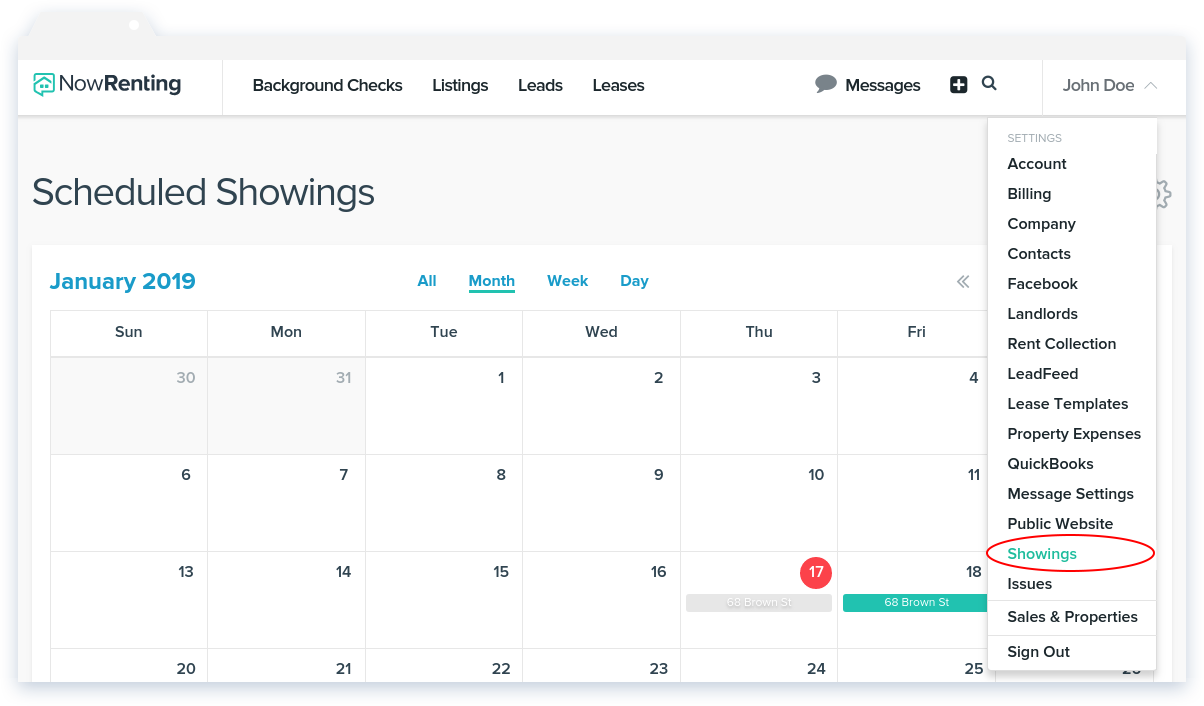
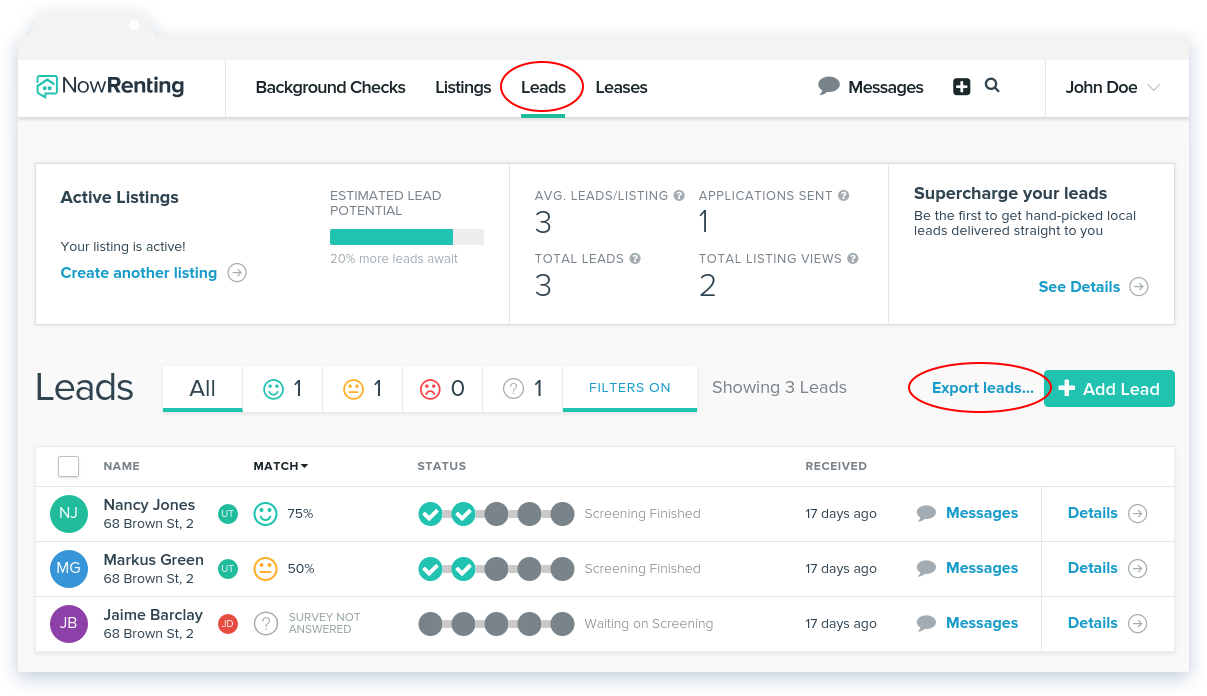
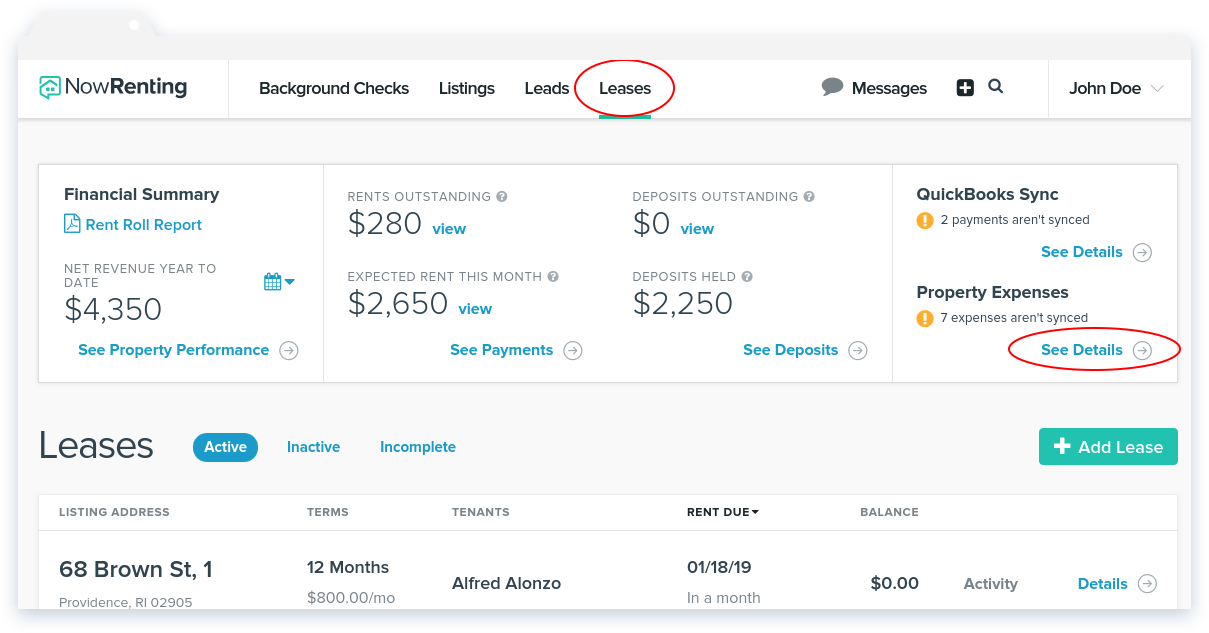
Navigate to the Expenses page by clicking Leases on the top navigation bar and then the See Details link under the Property Expenses section.

NowRenting -- Sync Expenses -- Navigate

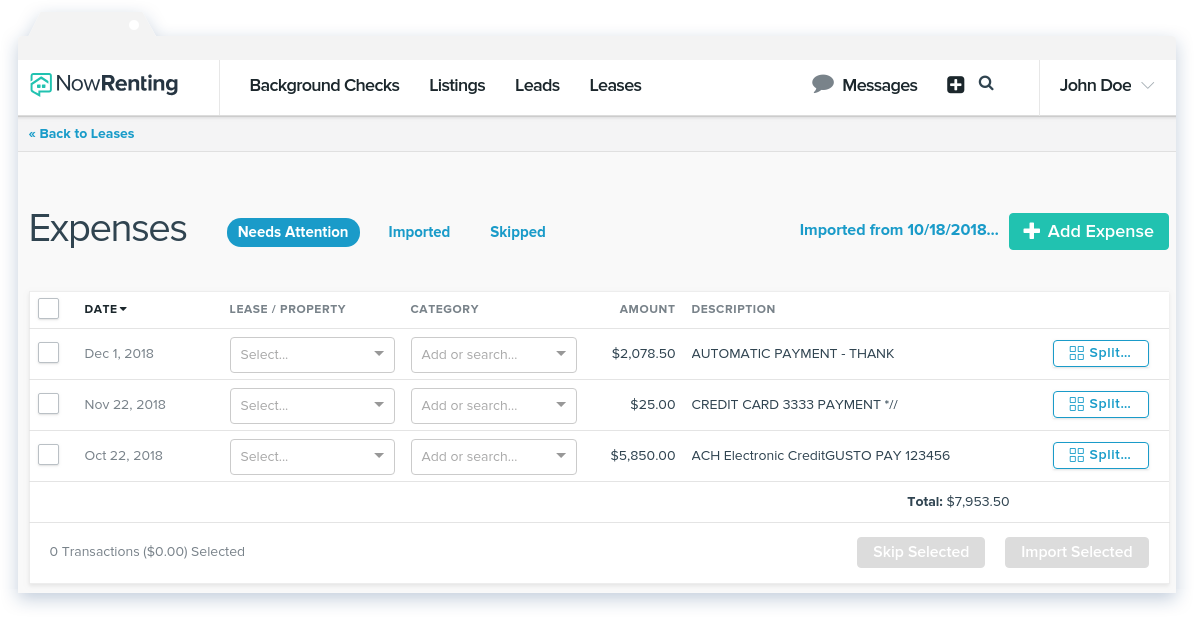
The Needs Attention pill shows a table of expenses that NowRenting has imported from your bank account, but have not yet been added to NowRenting’s financial data.

NowRenting -- Sync Expenses -- Needs Attention

Importing Older Expenses

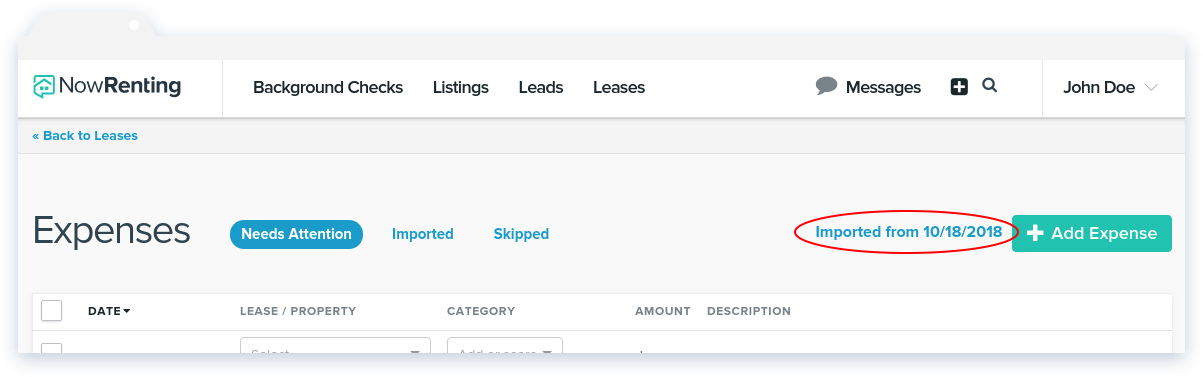
The expenses NowRenting imports from your bank account when you first connect cover a certain time period. However, you can import older expenses. Just click the Imported from [date] link. Pick a start date and click Import Expenses, and NowRenting will import all expenses going back to that date.

NowRenting -- Sync Expenses -- Import Older Expenses Link

Syncing Expenses

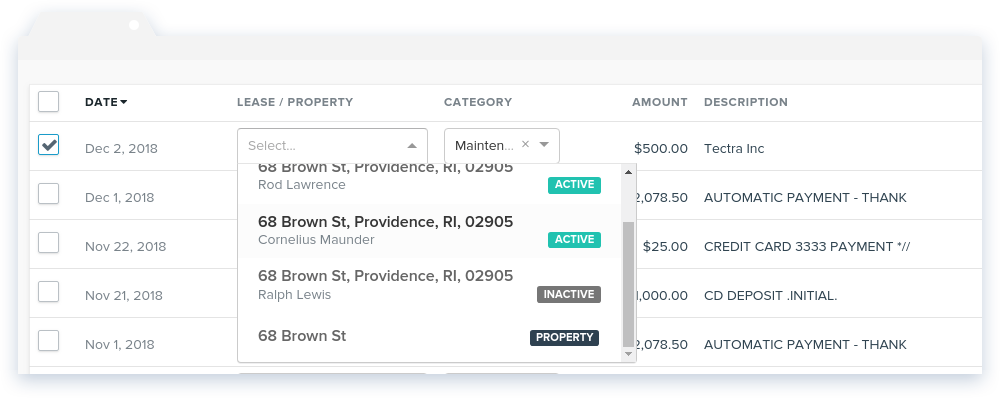
An expense cannot by synced until you choose which Lease or Property it’s associated with, as well as a category. Select a Lease or Property from the Lease / Property drop-down menu.

NowRenting -- Sync Expenses -- Choose Lease or Property

Then select a category from the Category drop-down. You can also create a new category by typing into the input field and clicking the Create Category option. (NowRenting will also suggest new categories you could add, based on the expense’s description. These are labeled Suggestion and are optional.)

See the Manage Categories section below for more information about how to manage your categories.

NowRenting -- Sync Expenses -- Choose Category

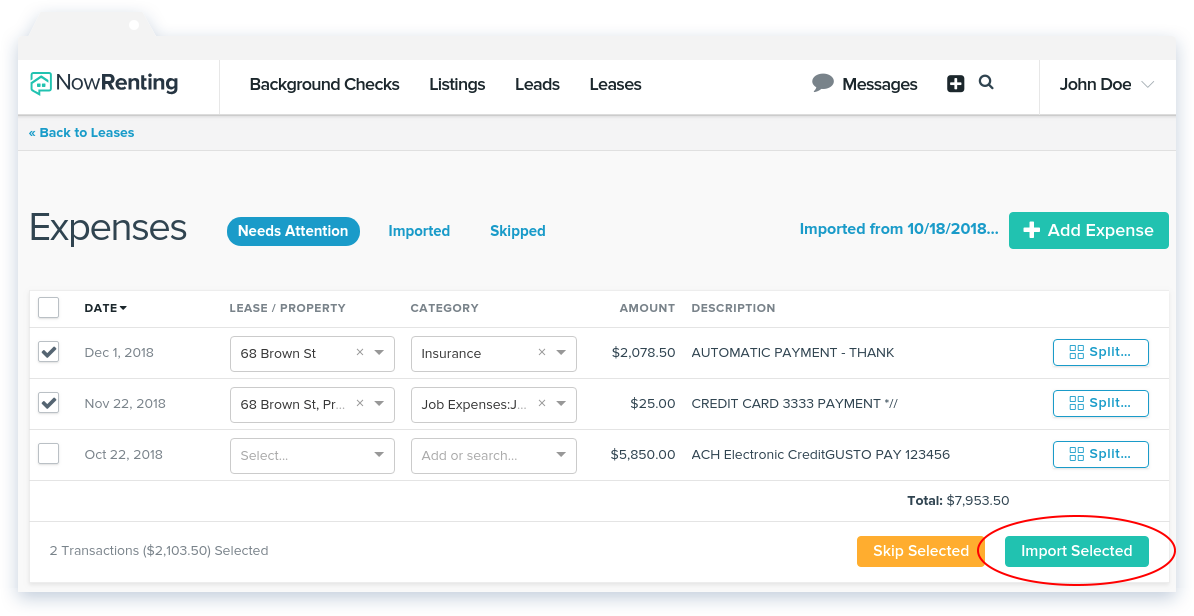
Click the checkboxes to the left to select which expenses you want to sync with NowRenting, then click Import Selected. If the button is grayed out, you may need to select a Lease / Property or a category for some expense.

You can also choose not to sync an expense with NowRenting. To do that, select it and click the Skip Selected button.

NowRenting -- Sync Expenses -- Import Selected

Splitting Expenses

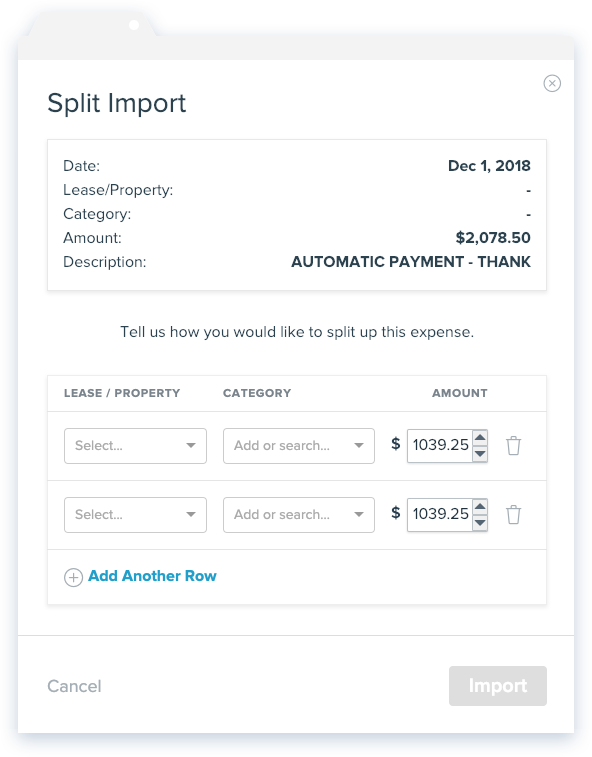
If an expense needs to be split between multiple leases, properties or categories, you can click the Split… button to the right.

Each row in the Split Import window will be entered in NowRenting’s system as a separate expense. Use the Add Another Row link to divide the expense into as many parts as you need. Click the Import button to finalize the expense.

NowRenting -- Sync Expenses -- Split Import Window

Imported Expenses

The Imported pill shows expenses that have been synced into NowRenting’s system. The Skipped pill shows those that have not.

NowRenting -- Sync Expenses -- Imported

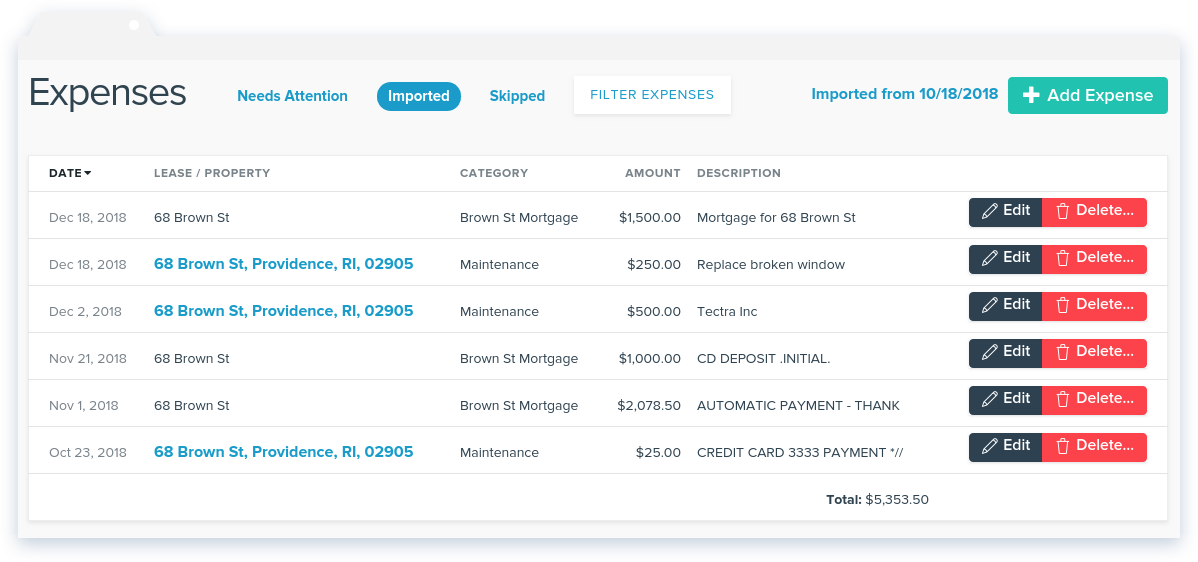
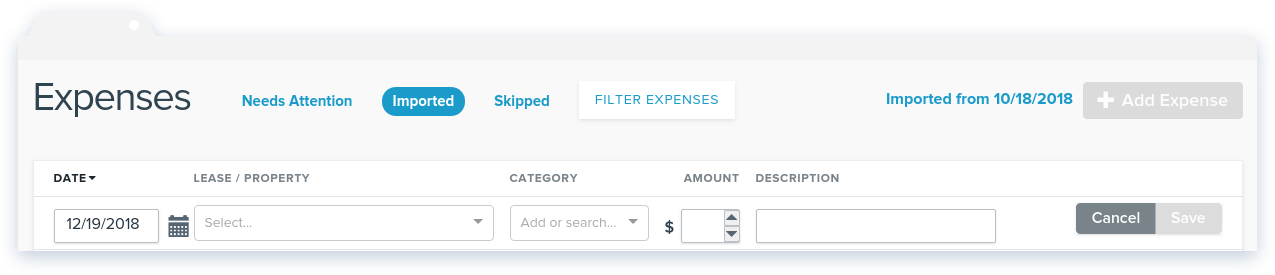
You can manually add an expense. Just click the Add Expense button. A new row will appear. Fill in the date, Lease or Property, category, amount and description, then click Save. The expense will be synced into NowRenting’s system just as if it had come from your bank.

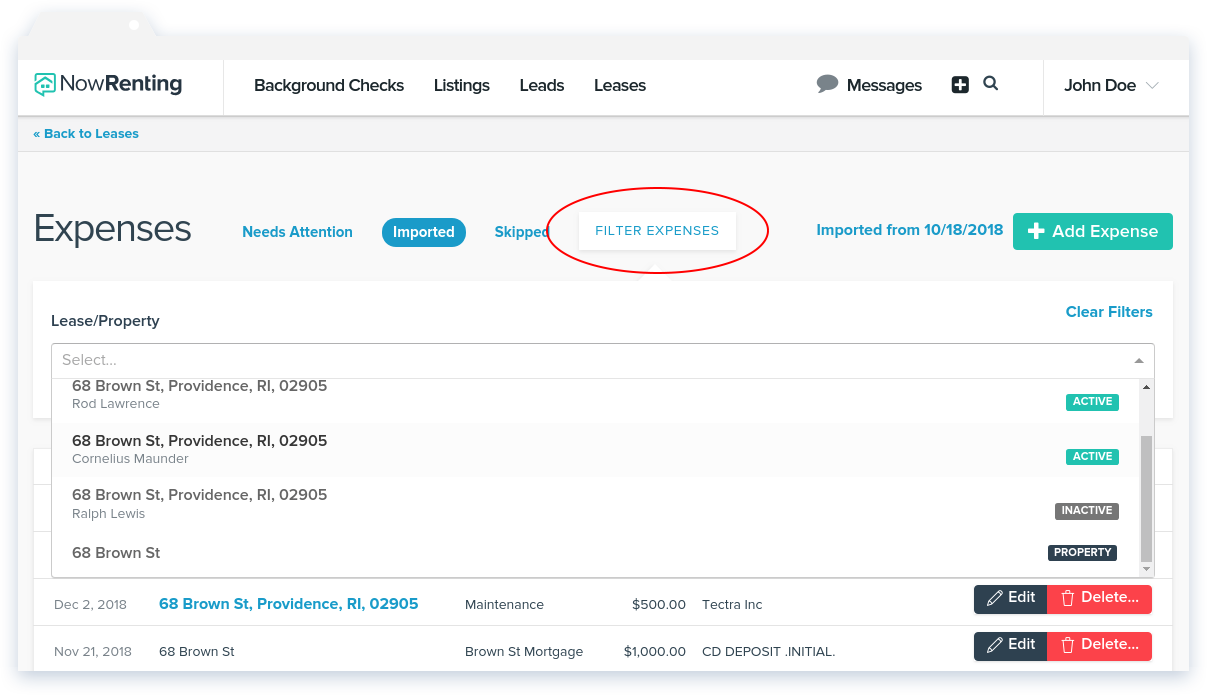
To see only the expenses belonging to a particular Lease or Property, use the filter. Click Filter Expenses and then select the Lease or Property you want to see.

NowRenting -- Sync Expenses -- Filter

Manage Categories

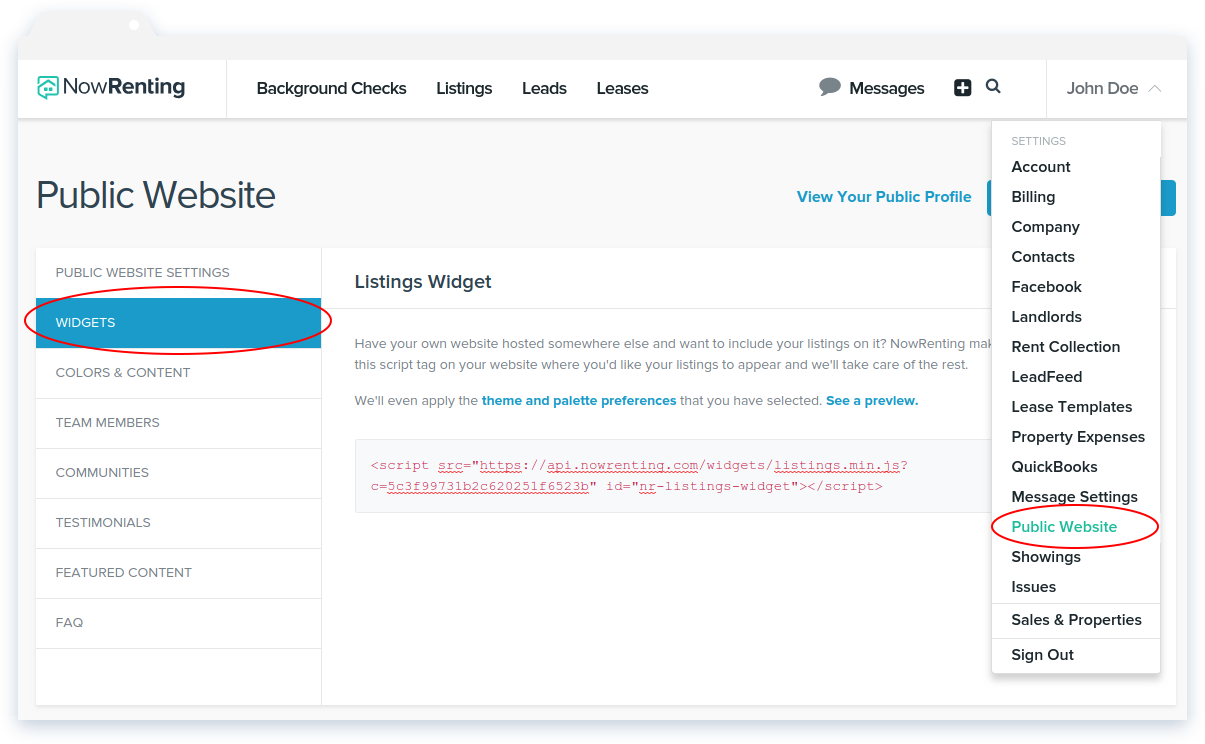
To manage your expense categories in NowRenting, select Property Expense from the main settings drop-down menu, then click the Categories tab.

NowRenting -- Manage Categories -- Navigate

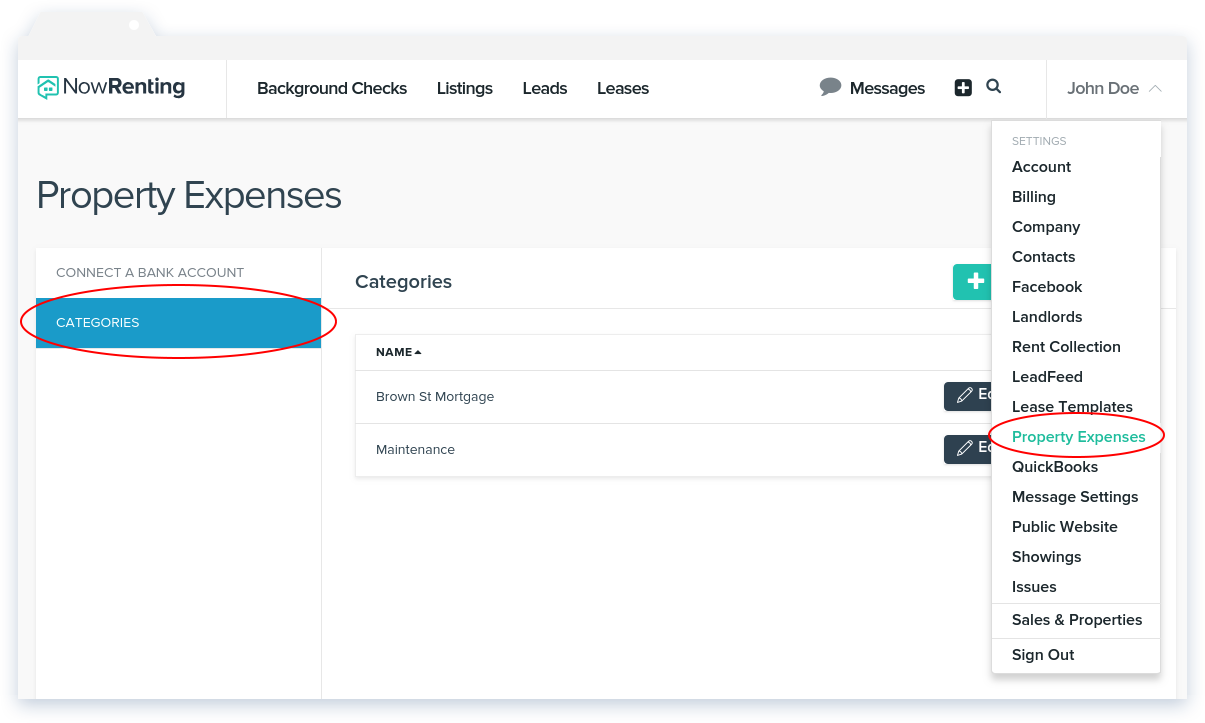
You can Add, Edit or Delete categories by clicking the appropriate button.

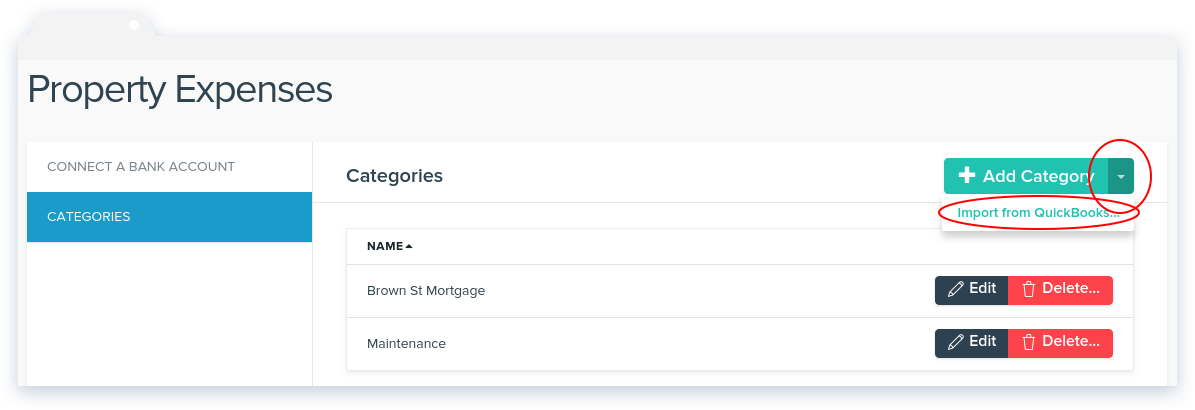
It is also possible to import expense categories from QuickBooks. QuickBooks calls these Expense Accounts. Read about how to connect NowRenting to your QuickBooks Desktop account here, and QuickBooks Online here. To import categories from a QuickBooks account, click the arrow to the right of the Add Category button and select Import from QuickBooks.

NowRenting -- Manage Categories -- Import from QuickBooks

If you have not connected your QuickBooks account, you’ll be prompted to do so in the window that comes up.

If your QuickBooks account uses nested categories, the hierarchy will be shown with a colon, like: “parent:child”.